
Are you looking for a recipe for homemade crusty bread rolls to accompany your meal? Or some small rolls to prepare as lunch or snack for your children? These rolls are ideal for any of these situations, and more!… These bread rolls are delicious when toasted for breakfast with some grated tomato and cheese, or with butter and jam. You will see that you will repeat this recipe over and over again.
Why you should make these crusty bread rolls
Making your own bread can seem like a very challenging task. I ventured for the first time making some french baguettes. And it was all because I realized how many additives bread bought in supermarkets can contain. I thought that by making my own bread, I could greatly reduce the amount of additives my family consumes, since bread is consumed with practically every meal. Little did I know that homemade bread would be soooo good.
Since the first loaves of bread I made were a complete success, I have been experimenting with different types of bread. These homemade crusty bread rolls are never missing at home, I make them every week and freeze them. When you defrost them, they are delicious and taste like freshly made. You could even put them in the oven for a few minutes, so you have warm and crispy bread rolls.
They are the ideal size to accompany any meal, breakfast, lunch and dinner. For breakfast, put them in the toaster for a few minutes and you will get perfectly golden toasts. Delicious with fresh grated tomato and any type of cheese, or with butter and homemade jam. Or dip the bread in the sauce of any of your favorite recipes.
This recipe requires making the dough a day in advance, but there's not much mystery to it. If you try these bread rolls, you will realize that they are really worth it.
Ingredients you need to make homemade bread rolls
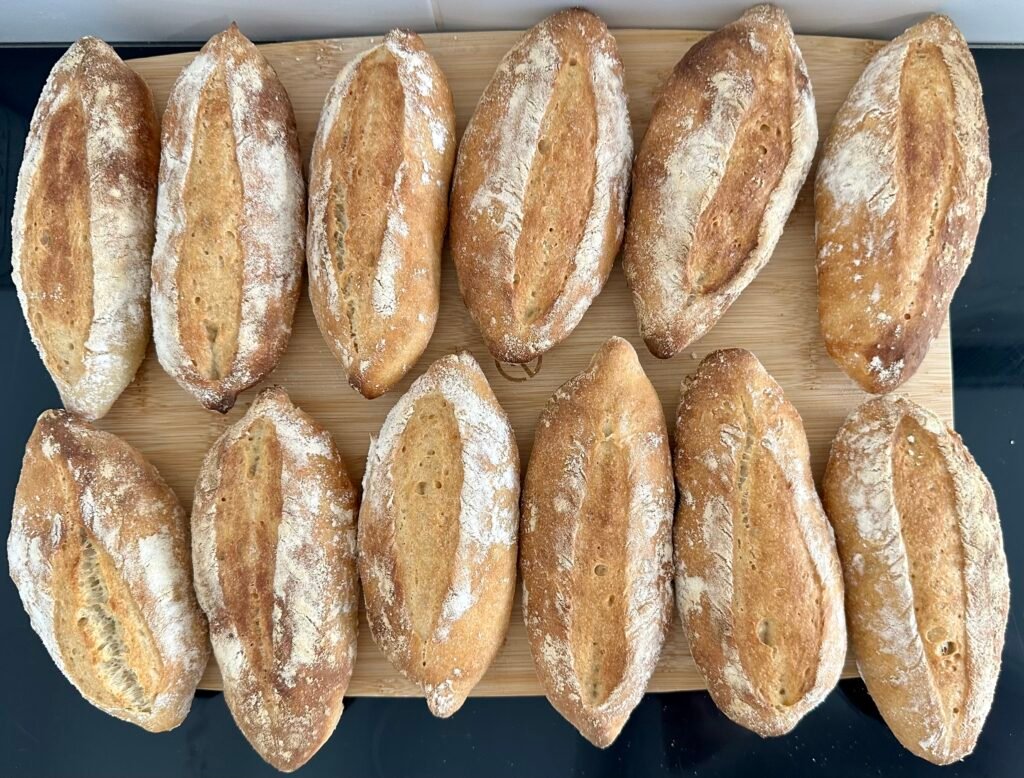
With this recipe you can make approximately 21 to 24 rolls.
- All-purpose flour: I usually use regular wheat flour to make any type of bread and it works perfectly for me. You can also use a special wheat flour for bread, you will get rolls with a slightly thicker crust and a denser interior. You need 1 kilo of wheat flour + a little extra to flour the surface where you are going to work the dough
- Water: in total you need 660 grams of filtered water, first you will use 600 grams and then 60 grams
- Bakery yeast: you need 2 bags of baker's yeast, each bag of yeast has 7 g
- Sugar: to make these homemade bread rolls you need 24 grams of sugar to activate the yeast
- Olive oil: you need 30 grams of olive oil
- Salt: to give flavor to these rolls you need 24 grams of salt
Kitchen tools you need to make this recipe
In order to make this recipe for homemade bread rolls you need the following kitchen utensils:
- Baking dish: to get a crispy crust, you need high humidity in the oven. To achieve this, place an oven-safe dish filled with water in the lower part of the oven
- Bowl: you need a large bowl to mix all the ingredients for the dough
- Kitchen scale: To get perfect bread rolls, measure all the ingredients using a kitchen scale
- Oven tray: you will use a large baking sheet to bake the bread rolls
- Baking paper: to prevent the bread from sticking, you need baking paper to cover the baking tray
- Cling film: you will need to cover the bowl with plastic wrap to store it in the refrigerator
- Kitchen towels when you are making the shape of bread, you will have to let the dough rise.For it to not dry out you will need to cover it with a kitchen towel moistened with warm water. You can also cover it with cling film.
- Oven rack: use an oven rack to cool the bread rolls
- Freezer bags: if you are planning to freeze the bread rolls, place them in freezer bags once they have cooled down
- Sharp knife: you need a sharp knife to make the cut in the bread
How to make homemade crusty bread rolls
To make these homemade bread rolls and get the best possible results, start a day before, as the dough needs to ferment slowly in the refrigerator. The steps to follow are:
Day 1:
Autolysis
Autolysis is a process in which you mix the flour with water and let it rest for at least 15 minutes. This process is used to achieve a more elastic and resistant dough. The resulting bread will also have a better flavor.
For this recipe for homemade bread rolls, mix 1 kilo of flour with 600 grams of filtered water in a large bowl. Knead for about 5 minutes and once well kneaded, cover the bowl with a damp kitchen towel. It´s ideal to let the dough rest for about 30 minutes, although if you don't have much time, you can leave it for about 15 minutes. If you forget the dough, don't worry because you can leave it for up to 1 hour.
Add the rest of the ingredients
Once the time of autolysis has passed, it´s time to add the other ingredients.
Put the remaining 60 grams of water in a small bowl, it is best if it´s a bit warm. Add the 24 grams of sugar and the two bags of yeast, let it rest for about 5 minutes or until the yeast has foamed.
Add it to the dough and knead for about 5 minutes, then add the olive oil and salt and knead for about 5 more minutes.
Cover the bowl with a damp cloth and let it rest for an hour. Once this time has passed, cover the bowl with plastic wrap and put it in the refrigerator until the next day or up to a maximum of 48 hours.
Day 2
Make the shape of the bread rolls
- Take the dough out of the refrigerator about 1 hour before you start making the rolls.
- Flour the area where you are going to work, and take the dough out of the bowl to knead it a little (1 minute is enough).
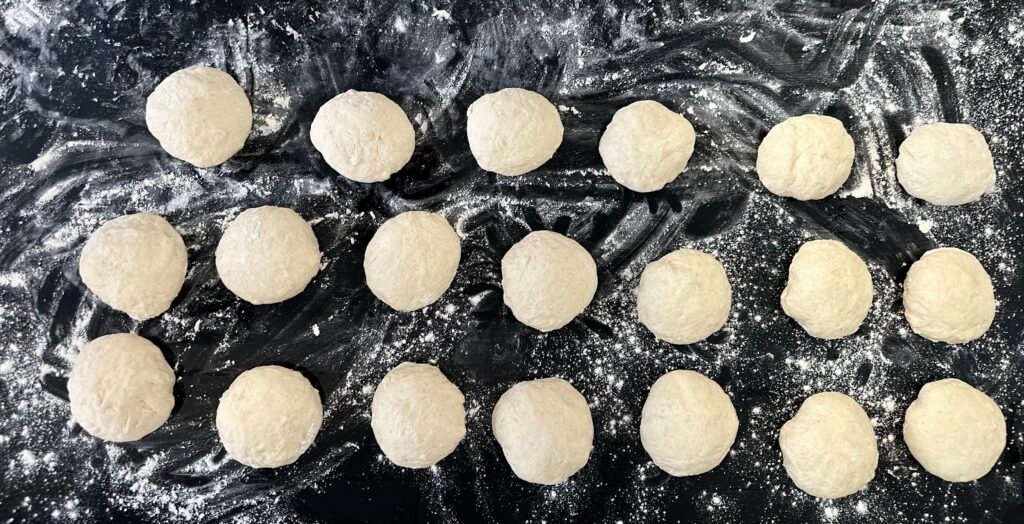
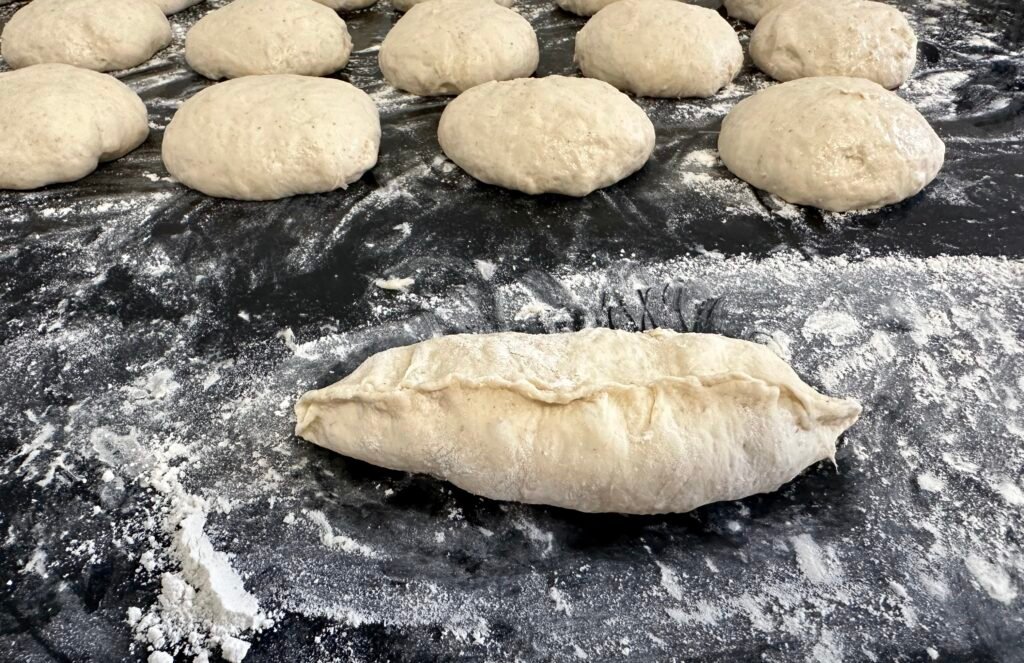
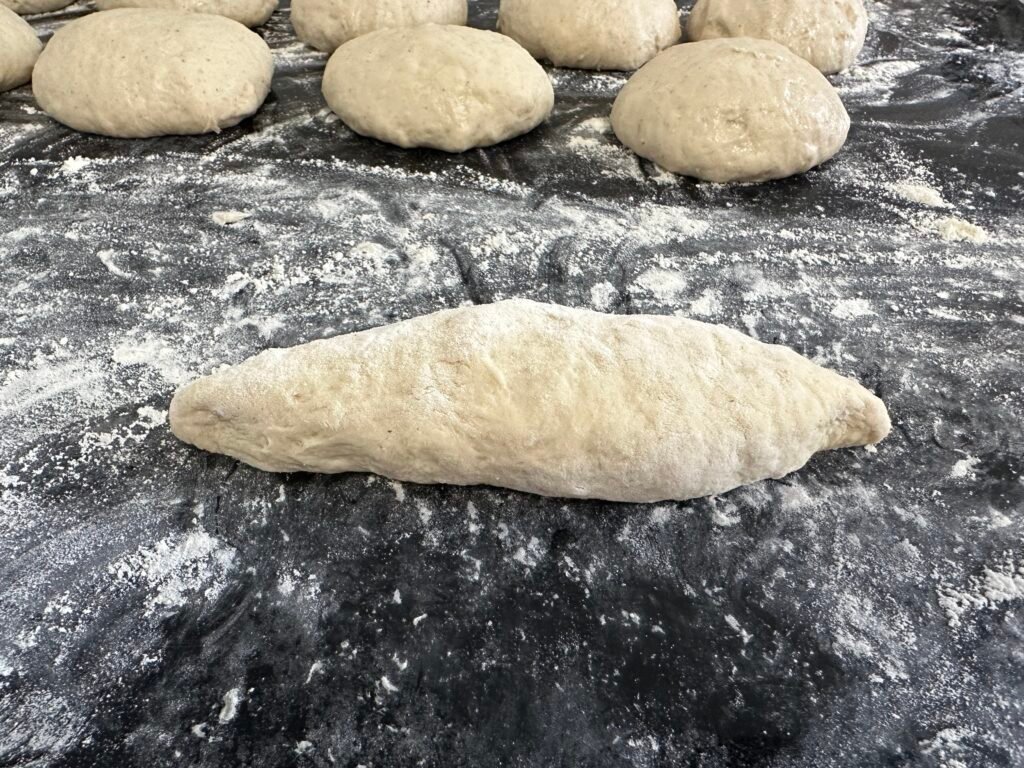
- Use the scale to make dough balls of approximately 80 grams. If you are not a perfectionist, you can do it by eye. If you see that the dough sticks a lot to your hands, try moistening them with water to handle the dough more easily. Place the dough balls on the counter or a floured table with enough room for them to rise a little without sticking together. Cover it with damp kitchen towels and let it rest for about 45 minutes. The times do not have to be strictly followed, if you are in a hurry, continue with the next step a little earlier. If meanwhile you are doing things and more time is spent, there is no problem. The bread rolls will not all fit on one baking sheet. You will be able to bake approximately 8 muffins at a time. If you only have one baking tray, prepare 3 sheets of baking paper. You put one on the baking tray, and two, for example, you leave on a table, on a tray or on the counter. Sprinkle a little flour on top of the baking paper.
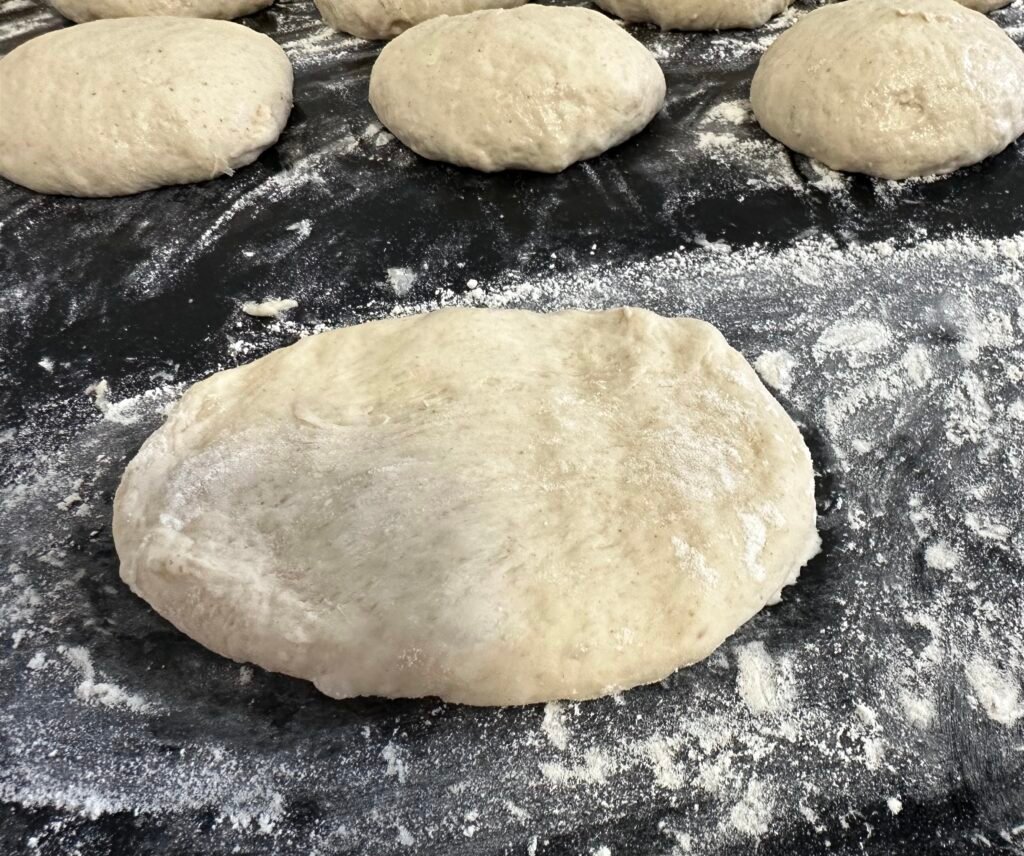
- Now it's time to make the shape of the homemade crusty bread rolls. On a floured surface, place a ball of dough and flatten it slightly making an oval shape.
- Close it as in the image in step number 5 and shape it with your hands if necessary.
- Place the bun on the baking sheet and repeat the process with all the other dough balls. Cover them with damp kitchen towels and let them rest for about 45 minutes.
Baking the breads
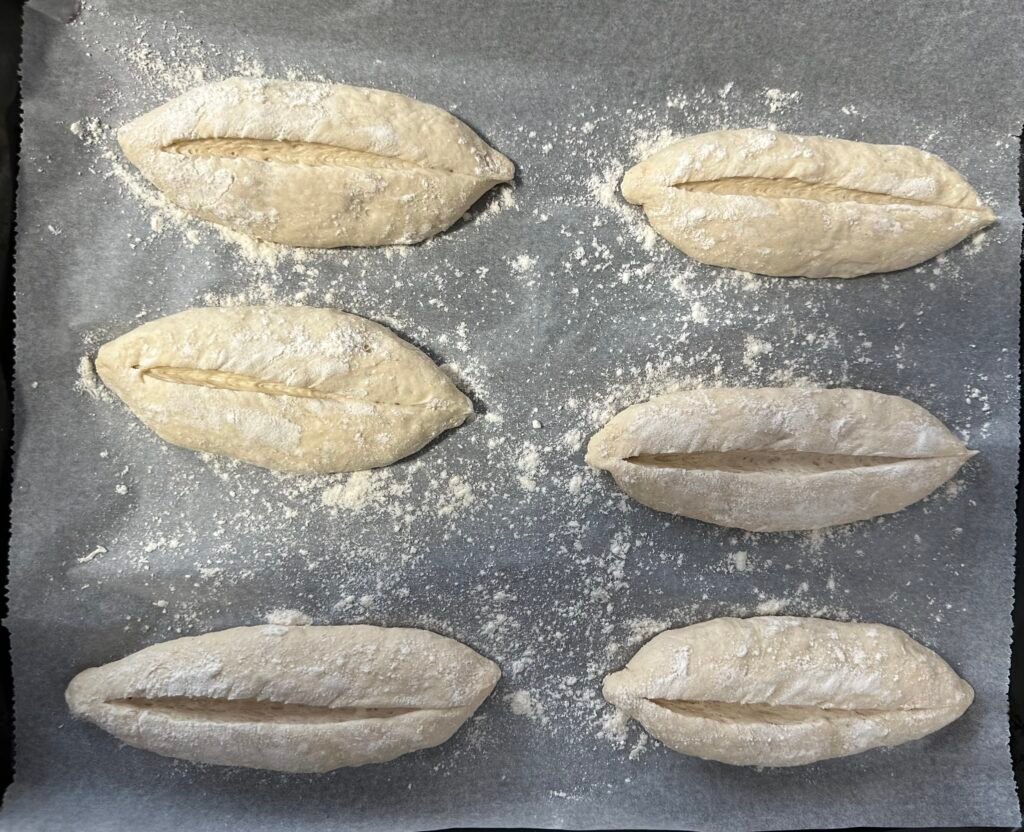
Place the tray with water in the lowest part of the oven and preheat the oven to 250º.
Before putting the rolls in the oven, sprinkle them with flour and use a sharp knife to make a cut from one side to the other. The cut has to be in a quick but smooth movement.
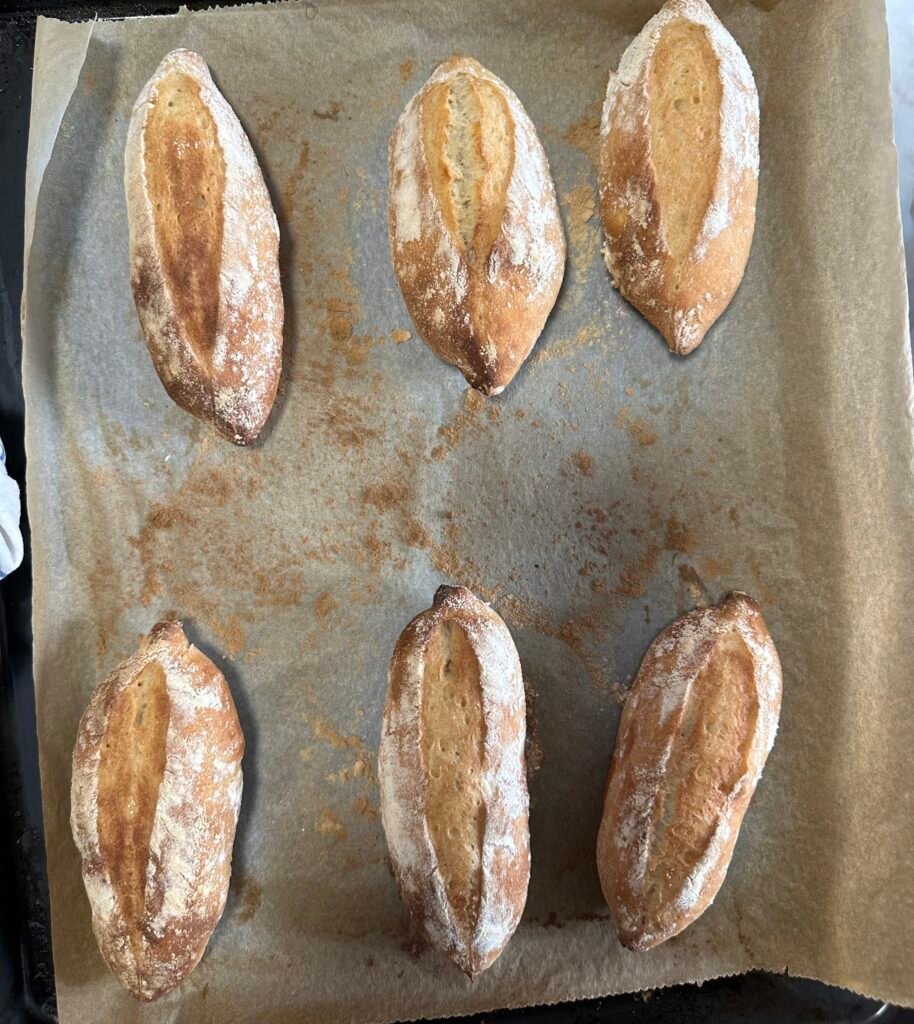
Put them in the oven, but be careful when opening it because a lot of very hot steam will come out. Bake them for about 10 minutes. Once this time has passed, open the oven to remove the steam and lower the temperature to 220º, bake for about 5 more minutes. And finally, bake them with the oven ajar (a little bit open) for about 5 more minutes to get a crispy crust.
Place the rolls on a rack to cool, raise the temperature again to 250º for the next batch of rolls, and repeat the baking process.
Frequently asked questions
Below I answer some frequently asked questions, if you do not find the answer, you can leave a comment below.
How many bread rolls can I make with this recipe?
With this recipe, making rolls of about 80 grams, you can get about 21-24 rolls.
What if I don't have time to leave the dough overnight in the refrigerator?
You can skip leaving the dough overnight, but it is better not to skip the refrigerator step, as you will have a better result. This is because the bread dough will go through a slow fermentation process. In the event that you need some bread rolls and you do not have time to wait for the dough to go through this slow fermentation process, let the dough rise for approximately 1 hour and a half and continue with the following steps that corresponds to day 2. They will turn out delicious too.
Can I freeze the bread rolls?
Yes! The good thing about making these bread rolls is that you can freeze them perfectly. For best results, freeze the rolls as soon as they have cooled down. This way, when you take them out of the freezer and defrost them, they taste like freshly made.
How do I defrost them?
To defrost them, take them out of the freezer half an hour beforehand. If you have the option of defrosting bread in the microwave, you will only need about 30 seconds of defrosting.
Is it normal for the dough to be sticky?
Yes, it´s very normal for the dough to be somewhat sticky. To handle the dough more easily when shaping the rolls, moisten your hands to prevent the dough from sticking too much to your hands.
Save this Homemade Bread Rolls recipe on Pinterest!
Save this recipe on Pinterest so that you won't lose it. Like this, when you go are going to make it, you don't go crazy looking for this recipe on the website. You just have to click on the Pinterest button below where it says “Spread the love”, and this recipe will automatically be saved on a board on your Pinterest account.

What to eat these homemade rolls with
Due to their size, these rolls are ideal for giving your children as a lunch or snack with some delicious things on it. They are also ideal to accompany it with a meal to dip the bread in the sauce, with a soup or really any recipe that invites you to dip the bread in the sauce.
Recipes that invite you to dip bread
- This Algerian Dolma (zucchini and potatoes stuffed with minced meat), needs a good bread to dip in to the delicious sauce.
- Accompany this exquisite creamy red pepper soup with some bread rolls.
More bread recipes
- Make these French Baguettes without kneading, very easy to make and delicious.
Did you make this recipe?
Make a photo and add the hashtag #cookingwithoumbilal
I would love to see your creations on Instagram, you can also tag me in your stories: @recetasbyoumbilal
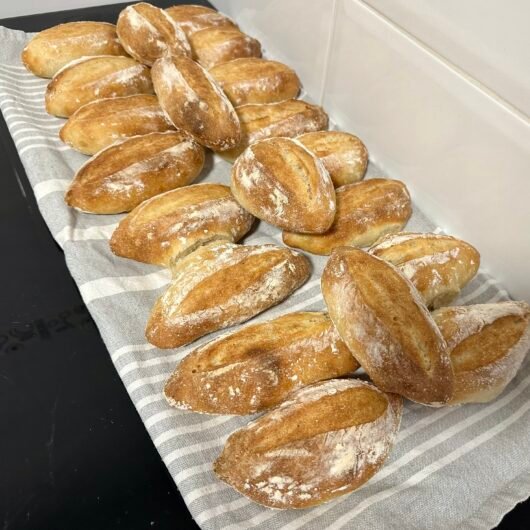
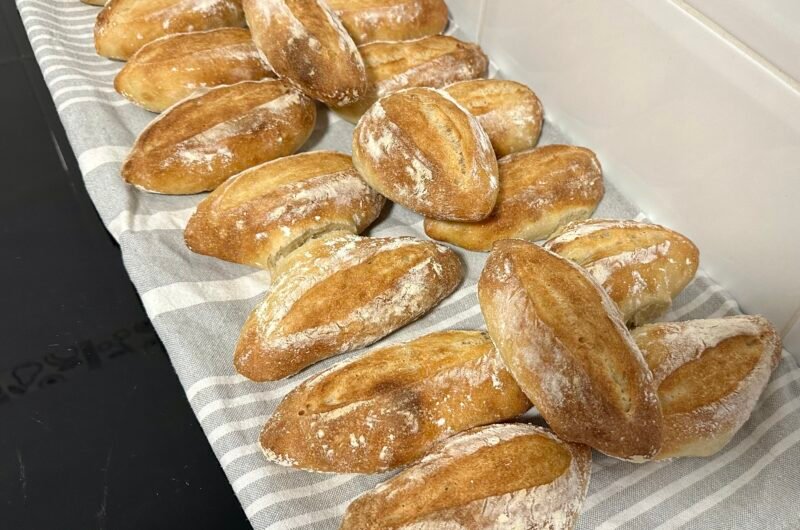
Homemade crusty bread rolls crispy on the outside and soft on the inside
Some easy-to-make homemade crusty bread rolls. They have a crispy, golden crust on the outside and a soft white interior. You will see that it's a pleasure to eat these rolls freshly out of the oven.
24
bread rolls30
minutes45
minutesKeep your device screen on
Ingredients
1 kilo all-purpose flour
660 grams filtered water (600 grams + 60 grams)
2 bags baker's yeast
24 grams sugar
30 grams olive oil
24 grams salt
Instructions
- Mix 1 kilo of flour with 600 grams of filtered water in a large bowl. Knead for about 5 minutes and once well kneaded, cover the bowl with a damp kitchen towel. It's ideal to let the dough rest for about 30 minutes, although if you don't have much time, you can leave it for about 15 minutes. If you forget the dough, don't worry because you can leave it for up to 1 hour.
- Put the remaining 60 grams of water in a small bowl, it is best if it's a bit warm. Add the 24 grams of sugar and the two bags of yeast, let it rest for about 5 minutes or until the yeast has foamed. Add it to the dough and knead for about 5 minutes, then add the olive oil and salt and knead for about 5 more minutes.
Cover the bowl with a damp cloth and let it rest for an hour. Once this time has passed, cover the bowl with plastic wrap and put it in the refrigerator until the next day or up to a maximum of 48 hours. - Take the dough out of the refrigerator about 1 hour before you start making the rolls.
Flour the area where you are going to work and take the dough out of the bowl to knead it a little (1 minute is enough). Use the scale to make dough balls of approximately 80 grams. If you are not a perfectionist you can do it by eye. If you see that the dough sticks a lot to your hands, try moistening them with water to handle the dough more easily. Place the dough balls on the counter or a floured table with enough room for them to rise a little without sticking. - Cover it with damp kitchen towels and let it rest for about 45 minutes. The times do not have to be strictly followed, if you are in a hurry, continue with the next step a little earlier. If while you are doing things and more time is spent, there is no problem.
The muffins will not all fit on one baking sheet. You will be able to bake approximately 8 muffins at a time. If you only have a baking tray, prepare 3 sheets of baking paper. You put one on the baking tray, and two, for example, you leave on a table, on a tray or on the counter. Sprinkle a little flour on top of the baking paper. - On a floured surface, place a ball of dough and flatten it slightly making an oval shape. Close it as in the image in step number 6 and shape it with your hands if necessary. Place the bun on the baking sheet and repeat the process with all the other dough balls. Cover them with damp kitchen towels and let them rest for about 45 minutes.
- Baking
- Place the tray with water in the lowest part of the oven and preheat the oven to 250º.
Before putting the rolls in the oven, sprinkle them with flour and use a sharp knife to make a cut from one side to the other. The cut has to be in a quick but smooth movement. - Put them in the oven, but be careful when opening it because a lot of very hot steam will come out. Bake them for about 10 minutes. Once this time has passed, open the oven to remove the steam and lower the temperature to 220º, bake for about 5 more minutes. And finally, bake them with the oven ajar (a little bit open) for about 5 more minutes to get a crispy crust.
- Place the rolls on a rack to cool down, raise the temperature again to 250º for the next batch of rolls, and repeat the baking process.
Notes
- Remember that all ovens are different, therefore cooking time may vary.
- For all my recipes I use an electric oven with a fan.


Pingback: Barras de pan sin amasar paso a paso - Baguette - Recetas by Oum Bilal
Pingback: Brioche Especial Aromatizado Con Azahar - Recetas by Oum Bilal